The OnePlus 7 Pro was only the second device from the company to sell with a partner carrier in the United States, specifically T-Mobile. The device is no longer sold through T-Mobile (getting replaced by the OnePlus 7T), but you might own a T-Mobile OnePlus 7 Pro you bought through the carrier rather than from OnePlus directly or through a third party.
When you buy a T-Mobile OnePlus device you are not getting the same experience as those who buy from other sources. There are some subtle hardware differences (such as the lack of a dual SIM card tray in the T-Mobile variant) as well as some software differences.
The software differences can be a bit of a pain point for some users, considering those who buy unlocked get very fast Android updates and have a generally bloat-free experience. Meanwhile, T-Mobile software updates come at a slower pace and there are some pre-installed apps you simply can't get rid of without rooting/modding the device.
Related: How to flash your T-Mobile OnePlus 6T with unlocked software for fast updates
Luckily, there is a way for you to convert the software on your T-Mobile OnePlus 7 Pro so it essentially becomes an unlocked variant. That means your T-Mobile phone will get the same Oxygen OS updates as non-T-Mobile variants and all the T-Mobile bloatware will be gone.
Follow along below to convert your T-Mobile OnePlus 7 Pro into an unlocked variant!
How to convert the T-Mobile OnePlus 7 Pro software

The OnePlus 7 Pro launched on T-Mobile in May 2019, so the method of flashing the unlocked ROM over the T-Mobile ROM is still fresh. However, it's very similar to the procedure for flashing unlocked software over the T-Mobile OnePlus 6T, so it's a relatively safe thing to do.
Before we get into the instructions, though, there are some very important things you need to understand before doing this:
- This process will completely wipe your device's data. Be sure to make a full backup of anything you need.
- You do not need an unlocked bootloader to make this work. You also do not need the device to be SIM unlocked. However, this process WILL NOT unlock your bootloader or SIM unlock your phone. This is not a way around fully paying off your T-Mobile device bill before moving to a new carrier.
- This process will not root your device. In fact, rooting seems to cause problems for now with this method, so we'd suggest avoiding it for the time being.
- You will need a Windows computer for this tutorial (sorry macOS and Linux users). If you are confident in using Windows emulators on other operating systems, do so at your own risk.
- You will also need the original USB cable that came with your OnePlus 7 Pro. If you don't have that, a high-quality, short-and-thick cable will do. Avoid cheap/thin cables as they might not work and could cause problems.
One last thing: Android Authority cannot guarantee this method of swapping your phone's software is going to work. If you follow the instructions to the letter you shouldn't face any issues, but we cannot be responsible if something does go wrong. Proceed at your own risk!
Step one: Download assets

You'll need to download three software packages: a patched non-T-Mobile Oxygen OS build for your OnePlus 7 Pro, the drivers for your computer to facilitate the flash, and a patch program that allows for that software to be installed.
These three pieces of software come from independent community developers. These are not official in any way, so please download carefully.
All three pieces of software are located here. You'll need to download each of the files listed below:
- guacamole_21.O.09_190516.7z (patched Oxygen OS)
- L2+drivers.rar (drivers)
- MsmDownloadTool V4.0-Patched_Alpha_3.exe (install tool)
It's important to note that you'll need the patched version of Oxygen OS listed above for this procedure. Do not download Oxygen OS from any other source, including OnePlus.com. You need to download the software from the link above.
Once you have those three pieces of software downloaded to your Windows-based PC, continue to the next step.
Step two: Prepare PC to flash

Now that you have all the software, you need to get both your PC and your T-Mobile OnePlus 7 Pro ready for the flashing process.
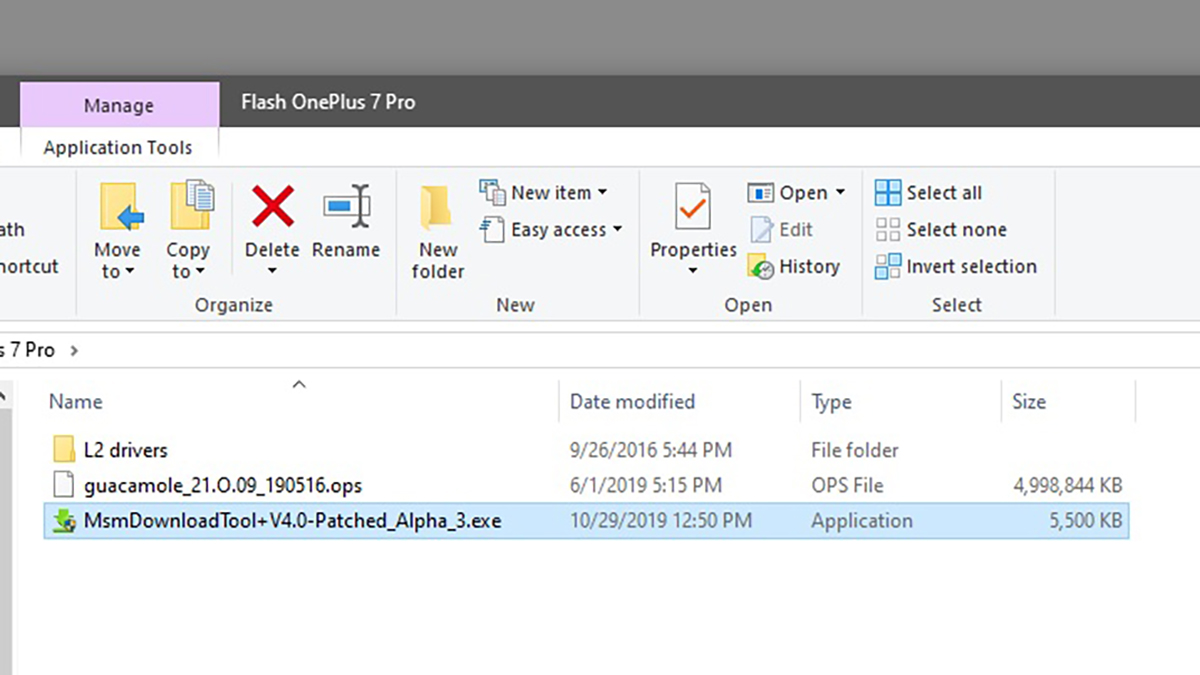
Let's start with your PC. First, create a new folder on your desktop called "Flash OnePlus 7 Pro" (or any name of your choosing). Next, open up the L2+drivers.rar package. If you have a problem with this, find and download a copy of WinRAR (which is free to try). Once you've opened the package, move the folder inside labeled "L2 drivers" into the Flash OnePlus 7 Pro folder on your desktop.
Next, do the same procedure with the Oxygen OS file, the one with "guacamole" in the name. Open up that package and move the ".ops" file into the Flash OnePlus 7 Pro folder on your desktop.
Finally, move the installer program — the one that starts with MSM — into the Flash OnePlus 7 Pro folder. You should now have a folder that looks like the image above, with all the files you've downloaded in one place.
Related: OnePlus 7 Pro review: Bigger and brighter, but is it better?
Now that you have all your files assembled, you need to ensure you have both adb and fastboot drivers installed on your PC. If you've ever flashed ROMs on Android smartphones before, you likely already have these and can skip this step. If this is your first time, just head to this site and click the Download 15 Seconds ADB Installer button. Wait for 30 seconds and the file will download.
Open up the package you downloaded and start the "adb-setup" program inside. You'll see a blue screen with a yes or no question. Input "Y" and hit enter, then another "Y" and enter. The program will install adb and fastboot drivers to your system.
The program will then ask if you want to install device drivers. Hit "N" and then hit enter, and the program will shut down.
Now, you should have adb and fastboot drivers installed on your PC and all your extracted files and programs in one folder on your desktop. Your PC is ready!
Step three: Prepare phone to flash

Let's now move on to getting your T-Mobile OnePlus 7 Pro ready. First, unlock your phone and head to Settings > System > Developer Options. If you don't see Developer Options, head to Settings > About Phone and tap on your software build number a bunch of times until it says you are now a developer. Developer Options will now be where it should be.
In Developer Options, find and enable USB debugging. Then, connect your phone to your computer with the original USB cable or a short and thick cable from somewhere else. A pop-up should appear on your phone asking if you trust the computer you just attached it to, which you obviously should.
If that pop-up doesn't appear, make sure you are in File Transfer mode by swiping down into your notification tray and tapping the Android System notification. There should be an option for File Transfer, which you should select, and then the pop-up should appear.
With that all done, unplug your OnePlus 7 Pro and fully power it down. Leave it powered off and continue on to the final step.
Step four: Flash your device

To recap, you should now have the following things done:
- Downloaded, extracted, and organized three packages so that all files therein are in one folder on your PC
- Installed adb and fastboot drivers on your PC
- Enabled USB debugging on your T-Mobile OnePlus 7 Pro and allowed connection with your PC
- Shut down your phone
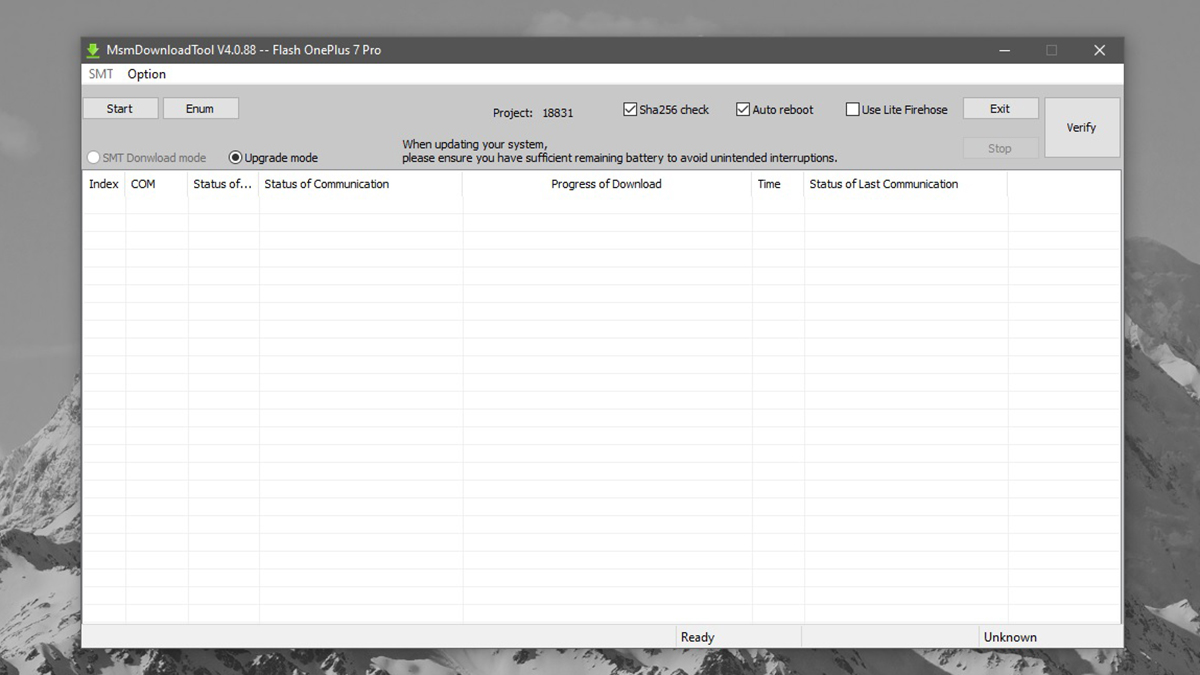
With all that done, you're ready to flash. Open up the Flash OnePlus 7 Pro folder on your desktop. Right-click the ".exe" file, the one that starts with MSM, and select "Run as Administrator." You should see a program on your screen that looks like the image above.
Towards the top of the program window, there's a checkbox with the words "Sha256 check" next to it. You want to untick this checkbox. The "Auto reboot" checkbox should still be ticked and the "Use Lite Firehose" one should remain unticked.
Now, the next steps are tricky, so be sure to follow them to-the-letter:
- On your T-Mobile OnePlus 7 Pro, which should still be powered off, hold down both the volume up and volume down keys at the same time.
- While holding down these keys, plug your phone into your computer using the USB cable.
- Keep your eye on the MSM program. As soon as you see the word "Connected" appear under the heading that says "Status of…" hit the "Start" button in the top left corner of the MSM program. You can then let go of the buttons on your phone.
Those three steps need to be done very quickly. For some reason, the OnePlus 7 Pro will reboot if it doesn't communicate with the MSM program quickly enough. If this happens, don't worry. Simply shut down your phone and repeat the three steps above until you get it right. We've seen reports of people needing to do this dozens of times before getting the timing right, so stay persistent.
Related: Here are the best T-Mobile deals and offers right now
You will know the process is complete when you see green "Download Complete" text in the program and your OnePlus 7 Pro automatically reboots. Once your phone has rebooted, you can safely unplug it and close out of the desktop program.
If everything went well, you now have the unlocked version of the OnePlus 7 Pro ROM on your phone. Shortly after your first boot, you should see an OTA notification to download the most recent version of Oxygen OS. Go ahead and install it so you're as up-to-date as possible.
If after doing this you decide you want to go back to the T-Mobile version of Oxygen OS, that is easily done. The procedure is the same except you'll need to download some new software. There is an XDA thread with instructions on what you need to do.
Do you own the T-Mobile OnePlus 7T? Stay tuned as we will soon have an article detailing instructions on how to flash that device to the unlocked version of Oxygen OS.
More posts about OnePlus
from Android Authority https://ift.tt/2PzgReu
via IFTTT


Aucun commentaire:
Enregistrer un commentaire